Nextcloud Snap Installation and Configuration
How to install
Prerequisites
In order to complete the steps in this guide, you will need the following:
- A sudo user and firewall configured on your server: You can create a user with
sudoprivileges and set up a basic firewall by following the Ubuntu 18.04 initial server setup guide. - (Optional) A domain name pointed to your server: We will be securing connections to the Nextcloud installation with TLS/SSL. Nextcloud can set up and manage a free, trusted SSL certificate from Let’s Encrypt if your server has a domain name. If not, Nextcloud can set up a self-signed SSL certificate that can encrypt connections, but won’t be trusted by default in web browsers. If you are using DigitalOcean, you can follow our guide on how to set up a domain name for your server if you intend to use Let’s Encrypt.
Once you have completed the above steps, continue on to learn how to set up Nextcloud on your server.
Step 1 – Installing Nextcloud
We will be installing Nextcloud using the snappy packaging system. This packaging system, available on Ubuntu 18.04 by default, allows organizations to ship software, along with all associated dependencies and configuration, in a self-contained unit with automatic updates. This means that instead of installing and configuring a web and database server and then configuring the Nextcloud app to run on it, we can install the snap package which handles the underlying systems automatically.
To download the Nextcloud snap package and install it on the system, type:
The Nextcloud package will be downloaded and installed on your server. You can confirm that the installation process was successful by listing the changes associated with the snap:
ID   Status  Spawn               Ready               Summary
2    Done    today at 16:12 UTC  today at 16:12 UTC  Install "nextcloud" snap
The status and summary indicate that the installation was completed without any problems.
Getting Additional Information About the Nextcloud Snap
If you’d like some more information about the Nextcloud snap, there are a few commands that can be helpful.
The snap info command can show you the description, the Nextcloud management commands available, as well as the installed version and the snap channel being tracked:
Snaps can define interfaces they support, which consist of a slot and plug that, when hooked together, gives the snap access to certain capabilities or levels of access. For instance, snaps that need to act as a network client must have the network interface. To see what snap “interfaces” this snap defines, type:
Slot           Plug
:network       nextcloud
:network-bind  nextcloud
-              nextcloud:removable-media
To learn about all of the specific services and apps that this snap provides, you can take a look at the snap definition file by typing:
This will allow you to see the individual components included within the snap, if you need help with debugging.
Configuring an Administrative Account
There are a few different ways you can configure the Nextcloud snap. In this guide, rather than creating an administrative user through the web interface, we will create one on the command line in order to avoid a small window where the administrator registration page would be accessible to anyone visiting your server’s IP address or domain name.
To configure Nextcloud with a new administrator account, use the nextcloud.manual-install command. You must pass in a username and a password as arguments:
The following message indicates that Nextcloud has been configured correctly:
Nextcloud is not installed - only a limited number of commands are available
Nextcloud was successfully installed
Now that Nextcloud is installed, we need to adjust the trusted domains so that Nextcloud will respond to requests using the server’s domain name or IP address.
Adjusting the Trusted Domains
When installing from the command line, Nextcloud restricts the host names that the instance will respond to. By default, the service only responds to requests made to the “localhost” hostname. We will be accessing Nextcloud through the server’s domain name or IP address, so we’ll need to adjust this setting to accept these type of requests.
You can view the current settings by querying the value of the trusted_domains array:
localhost
Currently, only localhost is present as the first value in the array. We can add an entry for our server’s domain name or IP address by typing:
System config value trusted_domains => 1 set to string example.com
If we query the trusted domains again, we will see that we now have two entries:
localhost
example.com
If you need to add another way of accessing the Nextcloud instance, you can add additional domains or addresses by rerunning the config:system:set command with an incremented index number (the “1” in the first command) and adjusting the --value.
Securing the Nextcloud Web Interface with SSL
Before we begin using Nextcloud, we need to secure the web interface.
If you have a domain name associated with your Nextcloud server, the Nextcloud snap can help you obtain and configure a trusted SSL certificate from Let’s Encrypt. If your Nextcloud server does not have a domain name, Nextcloud can configure a self-signed certificate which will encrypt your web traffic but won’t be able to verify the identity of your server.
With that in mind, follow the section below that matches your scenario.
Option 1: Setting Up SSL with Let’s Encrypt
If you have a domain name associated with your Nextcloud server, the best option for securing your web interface is to obtain a Let’s Encrypt SSL certificate.
Start by opening the ports in the firewall that Let’s Encrypt uses to validate domain ownership. This will make your Nextcloud login page publicly accessible, but since we already have an administrator account configured, no one will be able to hijack the installation:
Next, request a Let’s Encrypt certificate by typing:
You will first be asked whether your server meets the conditions necessary to request a certificate from the Let’s Encrypt service:
In order for Let's Encrypt to verify that you actually own the
domain(s) for which you're requesting a certificate, there are a
number of requirements of which you need to be aware:

1. In order to register with the Let's Encrypt ACME server, you must
   agree to the currently-in-effect Subscriber Agreement located
   here:

       https://letsencrypt.org/repository/

   By continuing to use this tool you agree to these terms. Please
   cancel now if otherwise.

2. You must have the domain name(s) for which you want certificates
   pointing at the external IP address of this machine.

3. Both ports 80 and 443 on the external IP address of this machine
   must point to this machine (e.g. port forwarding might need to be
   setup on your router).

Have you met these requirements? (y/n)
Type y to continue.
Next, you will be asked to provide an email address to use for recovery operations:
Please enter an email address (for urgent notices or key recovery): your_email@domain.com
Finally, enter the domain name associated with your Nextcloud server:
Please enter your domain name(s) (space-separated): example.com
Your Let’s Encrypt certificate will be requested and, provided everything went well, the internal Apache instance will be restarted to immediately implement SSL:
Attempting to obtain certificates... done
Restarting apache... done
You can now skip ahead to sign into Nextcloud for the first time.
Option 2: Setting Up SSL with a Self-Signed Certificate
If your Nextcloud server does not have a domain name, you can still secure the web interface by generating a self-signed SSL certificate. This certificate will allow access to the web interface over an encrypted connection, but will be unable to verify the identity of your server, so your browser will likely display a warning.
To generate a self-signed certificate and configure Nextcloud to use it, type:
Generating key and self-signed certificate... done
Restarting apache... done
The above output indicates that Nextcloud generated and enabled a self-signed certificate.
Now that the interface is secure, open the web ports in the firewall to allow access to the web interface:
You are now ready to log into Nextcloud for the first time.
Logging in to the Nextcloud Web Interface
Now that Nextcloud is configured, visit your server’s domain name or IP address in your web browser:
https://example.com
Note: If you set up a self-signed SSL certificate, your browser may display a warning that the connection is insecure because the server’s certificate is not signed by a recognized certificate authority. This is expected for self-signed certificates, so feel free to click through the warning to proceed to the site.
Since you have already configure an administrator account from the command line, you will be taken to the Nextcloud login page. Enter the credentials you created for the administrative user:

Click the Log in button to log in to the Nextcloud web interface.
The first time you enter, a window will be displayed with links to various Nextcloud clients that can be used to interact with and manage your Nextcloud instance:

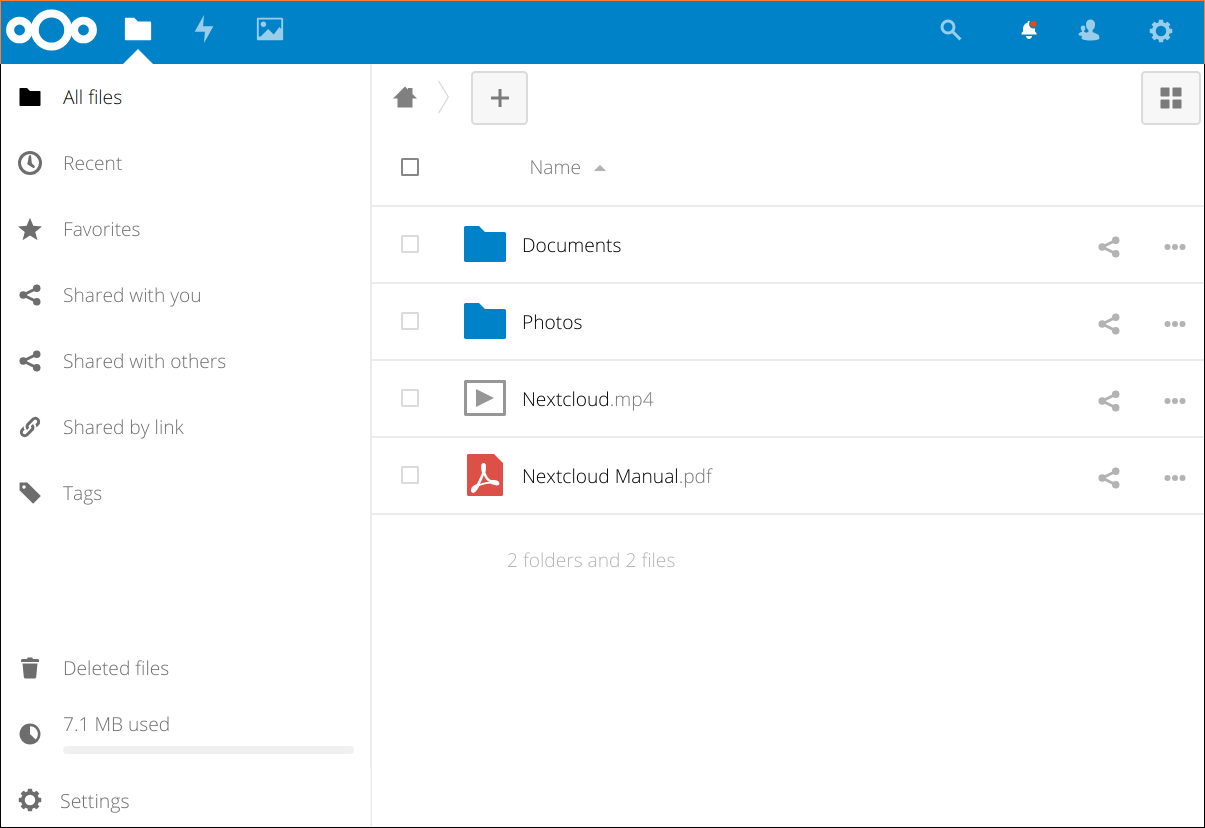
Click through to download any clients you are interested in, or exit out of the window by clicking the X in the upper-right corner. You will be taken to the main Nextcloud interface, where you can begin to upload and manage files:
Your installation is now complete and secured. Feel free to explore the interface to get more familiarity with the features and functionality of your new system.
How to use
After install, assuming you and the device on which it was installed are on the same network, you should be able to reach the Nextcloud installation by visiting <hostname>.local in your browser. If your hostname is localhost or localhost.localdomain, like on an Ubuntu Core device, nextcloud.local will be used instead.
Upon visiting the Nextcloud installation for the first time, you'll be prompted for an admin username and password. After you provide that information you'll be logged in and able to create users, install apps, and upload files.
Note that this snap includes a service that runs cron.php every 15 minutes, which will automatically change the cron admin setting to Cron for you.
Removable media
Also note that the interface providing the ability to access removable media is not automatically connected upon install, so if you'd like to use external storage (or otherwise use a device in /media or /mnt for data), you need to give the snap permission to access removable media by connecting that interface:
$ sudo snap connect nextcloud:removable-media
System monitoring
The System application requires a bit more access to the system than the snap uses by default (e.g. the ability to monitor network hardware, etc.). If you'd like to utilize those features, you'll need to connect the interface that allows that kind of access:
$ sudo snap connect nextcloud:network-observe
Configuration
Beyond the typical Nextcloud configuration (either by using nextcloud.occ or editing /var/snap/nextcloud/current/nextcloud/config/config.php), the snap exposes extra configuration options via the snap set command.
HTTP/HTTPS port configuration
By default, the snap will listen on port 80. If you enable HTTPS, it will listen on both 80 and 443, and HTTP traffic will be redirected to HTTPS. But perhaps you're putting the snap behind a proxy of some kind, in which case you probably want to change those ports.
If you'd like to change the HTTP port (say, to port 81), run:
$ sudo snap set nextcloud ports.http=81
To change the HTTPS port (say, to port 444), run:
$ sudo snap set nextcloud ports.https=444
Note that, assuming HTTPS is enabled, this will cause HTTP traffic to be redirected to port 444. You can specify both of these simultaneously as well:
$ sudo snap set nextcloud ports.http=81 ports.https=444
Note: Let's Encrypt will expect that Nextcloud is exposed on ports 80 and 443. If you change ports and don't put Nextcloud behind a proxy such that ports 80 and 443 are sent to Nextcloud for that domain name, Let's Encrypt will be unable to verify ownership of your domain and will not grant certificates.
Also note: Nextcloud's automatic hostname detection can fail when behind a proxy; you might notice it redirecting incorrectly. If this happens, override the automatic detection (including the port if necessary), e.g.:
$ sudo nextcloud.occ config:system:set overwritehost --value="example.com:81"
PHP Memory limit configuration
By default, PHP will use 128M as the memory limit. If you notice images not getting previews generated, or errors about memory exhaustion in your Nextcloud log, you may need to set this to a higher value.
If you'd like to set the memory limit to a higher value (say, 512M), run:
$ sudo snap set nextcloud php.memory-limit=512M
To set it to be unlimited (not recommended), use -1:
$ sudo snap set nextcloud php.memory-limit=-1
Cronjob interval configuration
By default the cronjob interval is 15 minutes.
To adjust it (say, 10 minutes) simply run:
$ sudo snap set nextcloud nextcloud.cron-interval=10m
If you want to disable the cronjob completely, run:
$ sudo snap set nextcloud nextcloud.cron-interval=-1
To reenable it again simply set the nextcloud.cron-interval snap variable to a value that isn't -1
Debug mode
By default, the snap installs itself in production mode, which prevents Apache and PHP from providing any detailed version or library information in the HTTP headers and error pages. Debug mode can be enabled with:
$ sudo snap set nextcloud mode=debug
"debug" and "production" are the only valid modes.
Included CLI utilities
There are a few CLI utilities included:
nextcloud.occ:- Nextcloud's
occconfiguration tool. You can always edit the config file directly (/var/snap/nextcloud/current/nextcloud/config/config.php) but the configuration tool provides a CLI interface for it. Seenextcloud.occ -hfor more information. Note that it requiressudo.
- Nextcloud's
nextcloud.mysql-client:- MySQL client preconfigured to communicate with Nextcloud MySQL server. This may be useful in case you need to migrate Nextcloud installations. Note that it requires
sudo.
- MySQL client preconfigured to communicate with Nextcloud MySQL server. This may be useful in case you need to migrate Nextcloud installations. Note that it requires
nextcloud.mysqldump:- Dump Nextcloud database to stdout. You should probaby redirect its output to a file. Note that it requires
sudo.
- Dump Nextcloud database to stdout. You should probaby redirect its output to a file. Note that it requires
nextcloud.enable-https:- Enable HTTPS via self-signed certificates, Let's Encrypt, or custom certificates. HTTP will redirect to HTTPS. Non-custom certificates will automatically be kept up-to-date. See
nextcloud.enable-https -hfor more information. Note that it requiressudo.
- Enable HTTPS via self-signed certificates, Let's Encrypt, or custom certificates. HTTP will redirect to HTTPS. Non-custom certificates will automatically be kept up-to-date. See
nextcloud.disable-https:- Disable HTTPS (does not remove certificates). Note that it requires
sudo.
- Disable HTTPS (does not remove certificates). Note that it requires
nextcloud.manual-install:- Manually install Nextcloud instead of visiting it in your browser. This allows you to create the admin user via the CLI. Note that it requires
sudo.
- Manually install Nextcloud instead of visiting it in your browser. This allows you to create the admin user via the CLI. Note that it requires
nextcloud.export:- Export data suitable for migrating servers. By default this includes the Nextcloud database, configuration, and data. See
nextcloud.export -hfor more information. Note that it requiressudo.
- Export data suitable for migrating servers. By default this includes the Nextcloud database, configuration, and data. See
nextcloud.import:- Import data exported from another Nextcloud snap instance (via
nextcloud.export). By default this imports the database, config, and data. Seenextcloud.import -hfor more information. Note that it requiressudo.
- Import data exported from another Nextcloud snap instance (via
Where is my stuff?
$SNAP_DATA(/var/snap/nextcloud/current/by default)- Logs (Apache, PHP, MySQL, Redis, and Nextcloud logs)
- Keys and certificates
- MySQL database
- Redis database
- Nextcloud config
- Any Nextcloud apps installed by the user
$SNAP_COMMON(/var/snap/nextcloud/common/by default)- Nextcloud data
Hacking
If you change something in the snap, build it, install it, and you can run a suite of acceptance tests against it. The tests are written in ruby, using capybara and rspec. To run the tests, you first need to install a few dependencies:
$ sudo apt install gcc g++ make qt5-default libqt5webkit5-dev ruby-dev zlib1g-dev
$ sudo gem install bundle
$ cd tests/
$ bundle install
Additionally, if you do not have X configured, install the following for a 'fake' X server.
$ sudo apt install xvfb
Make sure the snap has a user called "admin" with password "admin" (used for login tests):
$ sudo nextcloud.manual-install admin admin
And finally, run the tests:
$ cd tests/
$ rake test